Colored Pencil Tutorials how to Draw Latest Tutorial Colored Pencil Drawing a Frog on a Pencil

Colored Pencil Tutorials for Beginners and Advanced Artists

Become a Member

Stunning Results with Colored Pencil Tutor

If you're looking for someone to show you how to make your drawings look like photos as much as possible, your search ends right here. Anyone can draw by following instructions and watching our drawing videos. You too can achieve this with the guidance of our experienced teacher Jasmina Susak, who has inspired and taught many satisfied and happy students.

Our colored pencil tutorials provide a wide range of demonstrations suitable for everyone, beginners, intermediates, and advanced artists. Whether you want to draw people, animals, superheroes, objects, fruits, cars, landscapes, etc., we've got you covered. Our step-by-step colored pencil drawing tutorials will help you take your drawings to the highest level!

colored pencil drawing giraffe reference photo realism
colored pencil picker graphite drawing

What You Will Learn:

  • Creating unique textures
  • Mastering colored pencil blending techniques
  • Choosing the right colors for human faces
  • Drawing portraits and rendering lifelike skin tones
  • Capturing animals, fur, feathers, and lifelike eyes
  • Studying hair in all colors and shapes
  • Creating realistic fabric textures
  • Drawing on toned paper and enhancing highlights
  • Achieving smooth gradients
  • And much more!

red ribbon with the NEW word on it

What You Get as Subscriber:

  • More than 410 hours of colored pencil real-time drawing videos.
  • 24/7 free access to PenPick - Colored Pencil Picker where you can upload your own photos and receive suggestions on which pencils to use for the selected area.
  • A lot of tips, advice, techniques, and demonstrations to help you learn faster and better.
  • Explanations on blending, mixing, and choosing colored pencils, as well as the best art materials to maximize your efforts.
  • Lots of talk on how, why, and what the artist uses to achieve photorealistic drawing, and what to avoid.
  • A list of materials used.
  • Printable pencil sketches for coloring along.
  • High-resolution reference photographs (if not drawn from scratch).
  • Plenty of written step-by-step drawing tutorials with pictures.
  • Every moment of the drawing process is recorded, with no skipped or sped-up parts.
  • You can pause and start the videos, working at your own pace.
  • No obligation - you can change subscription plan, or cancel at any time.
  • New tutorials are added EVERY WEEK.
  • Share your progress with the teacher and receive feedback. Personal support and the opportunity to chat directly with the artist herself.
colored pencil drawing tutorial for beginners bruce lee face head drawn

Access to PenPick - Colored Pencil Picker

As our student, you'll gain exclusive access to PenPick, our Colored Pencil Picker web application where you can upload your own images, select a part of the photo, and receive suggestions on the closest matching colored pencil. PenPick features the 3 most popular brands of colored pencils:

  • Prismacolor Premier - 150 colored pencils
  • Caran d'Ache Luminance 6901 - 100 colored pencils
  • Faber-Castell Polychromos - 120 colored pencils

The app also includes the Accuracy function, indicating how closely the suggested color matches. A higher percentage suggests a more suitable colored pencil. Learn more on their website: www.pen-pick.com

colored pencil picker software help beginner artists

Choose Your Membership Plan

$19 / Month

  • Ideal for those who prefer flexibility.
  • Pay on a month-to-month basis.
  • Cancel anytime with no long-term commitment.
  • Access to new tutorials as they are released.

$99 / Year

  • Save on the annual plan.
  • Pay once a year for hassle-free access.
  • Enjoy the same great features with reduced cost.
  • Access to new tutorials as they are released.

$299 / Lifetime Access

  • Best value for long-term enthusiasts.
  • Pay once for unlimited access.
  • No recurring payments.
  • Access to new tutorials as they are released.

Cancel any time. Read our Privacy Policy and Terms of Use. Have a question? Contact us

pencil color sketch tutorial cheetah animal wild big cat drawn

The World of Lifelike Colored Pencil Art

Many people encounter challenges with colored pencils and struggle to achieve the desired results. As a result, frustration often leads them to abandon colored pencils altogether. When used correctly, colored pencils have the potential to transform drawings into lifelike works of art, resembling photographs or paintings.

Through our tutorials, you will explore the possibilities this underrated medium offers and acquire colored pencil techniques presented in both videos and written tutorials with accompanying images. You'll gain the ability to create the drawings you've always envisioned. You won't require any special tools or solvents; all that's needed is high-quality paper and a set of professional-grade colored pencils. Our demonstrations will show you that you can create any texture using only colored pencils, even those that are traditionally challenging, such as human skin, hair, animal fur, shiny suits of superheroes, fabrics, or fire.

You can do it too!

While you might think that drawing talent is something you're born with, that's not entirely true. The only difference between people is the speed at which they learn. Some individuals grasp it faster, while others need more time and practice to become proficient with colored pencils. By enrolling in our courses, you'll significantly reduce the time it takes to master this skill, avoiding common mistakes that lead to flat-looking artwork. Instead, you'll build your skills and artistic style in the right direction at a faster pace.

If you draw frequently and compare your first drawing to your tenth, you'll be amazed at the progress you've made through practice. Now, just imagine what your 100th drawing will look like! Give us a try, and you'll witness the remarkable difference it makes in your final outcomes Join now!

color pencil drawing tutorial portrait pdf
color pencil drawing tutorial pdf free download space art earth stars Colored Pencil Tutorials Drawing Techniques space earth drawn stars Watch Tutorial

How to Draw with Colored Pencils

Everything About Colored Pencils: Tools, Techniques & Color Selection

Colored Pencil Tutorials Drawing Techniques drawn realistic burger

Revolutionizing Colored Pencil Art

Colored pencils have gained recent popularity among artists as a primary medium. However, there's a common misconception that they are associated with childlike quality due to the use of Crayola-like pencils in the past. As a result, some remain skeptical and underestimate the potential of colored pencil art, favoring mediums like oil painting.

In reality, we use specialized, high-quality colored pencils designed for professional artists. When used correctly, artist-grade colored pencils can produce results that resemble paintings, allowing for a wide range of subjects. The quality of your colored pencils plays a vital role. Utilizing preschool-grade pencils will yield subpar results and hinder your creative journey.

Why Choose Colored Pencils

  • Colored pencils have many benefits, and they are ideal for detailed work.
  • Colored pencils are versatile, allowing both gentle shading and bold layering for photorealism.
  • Portability: Work almost anywhere with ease.
  • Colored pencils don't require many other supplies, and even when investing in high-quality colored pencils, they remain more cost-effective compared to markers, oil paints, airbrushes, and similar tools.
  • Requires little space, no drying time, no odors, and creates no mess.
  • Colored pencils provide artists with excellent control over their art. What's special about this medium is that when you gently touch the paper with a colored pencil, no unexpected marks or smudges happen. This is different from markers, oil paints, or watercolors.
  • Wide availability of different types and kinds of artist-grade colored pencils around the world.
  • The option to buy individual colored pencils you use most can help you save on costs, avoiding the need to repeatedly buy complete sets.
  • And much more!

drawing Mystique best colored pencil picker helps artists realistic drawing Prismacolor Premier

Which colored pencil is best for drawing?

The best colored pencils for drawing depend on your needs. Prismacolor Premier and Faber-Castell Polychromos offer high-quality, blendable pigments, while budget-friendly options like Crayola work well for beginners. For professional artists, wax-based pencils like Caran d'Ache provide rich color depth and layering.

Brand Best For Features
Prismacolor Premier Blending, shading Soft core, vibrant colors
Faber-Castell Polychromos Detail work Oil-based, rich pigments
Caran d'Ache Professional art Expensive, premium archival quality
Crayola Beginners, kids Affordable, wax-based, easy to use
Derwent Layering, mixed media Varied hardness, water-soluble options
Staedtler Technical drawings Firm core, sharp details
colored pencil drawing of an orange

Kinds of Colored Pencils

Artist-Grade Colored Pencils

Professional, artist-grade colored pencils contain significantly more pigments and wax. They are filled with higher concentrations of high-quality pigments than cheap colored pencils used by preschool children, leaving a clear, rich color and a deep trace on the paper. Their lightfastness (resistance to UV rays in sunlight) is also measured and documented. Notable features of professional-grade colored pencils include core durability and water resistance. They are also available in a broader range of colors.

Scholastic-Grade Colored Pencils

Many of the same companies that produce artist-grade colored pencils also offer scholastic-level or classroom colored pencils. Scholastic-grade colored pencils lack the high-quality pigments and lightfastness standards found in artist-grade pencils, as they are intended for different users. While choosing the cheaper scholastic-grade color pencils might seem like a "good" solution, the workflow and results will be frustrating. As with almost everything in life, better quality often requires a higher price, but the benefits are worth it.

Types of colored pencils

There are many types of colored pencils. We distinguish two main types:

  • Wax-based colored pencils
  • Oil-based colored pencils

The center of a colored pencil is a pigmented interior, which is held together by a binder that is either wax-based or oil-based. This binder affects how the colored pencil can be spread on the drawing surface.

Wax-based binders can easily be blended, burnished, and layered. The colors can be easily mixed to achieve an artwork that is rich in colors. Such colored pencils are the Prismacolor Premier and Caran d'Ache Luminance 6901. On the other hand, we have oil-based ones such as the very popular Polychromos by Faber-Castell. The lead of an oil-based colored pencil is much harder and produces a slightly less rich color. So, layering and work great, but wax-based colored pencils blend better.

leopard drawing in progress sketch lines best colored pencils for adults Caran Luminance

Q&A Colored Pencil: Frequently Asked Questions

Which colored pencils do artists use?
Artists typically use Prismacolor, Faber-Castell Polychromos, and Caran d'Ache for high-quality pigmentation and blendability.
How can you tell if colored pencils are good quality?
High-quality colored pencils have smooth application, strong pigments, and good layering ability, and they are much more expensive than preschool colored pencils. A single professional colored pencil, when bought individually, can cost between $1 and $5.
How to start drawing with colored pencils?
Buy yourself a couple of professional pencils or the smallest sets first. Start with simple objects like a sphere, where you can learn to create a smooth gradient that will make your drawings three-dimensional and lifelike. Head over to the part of this site where we have a FREE drawing tutorial on coloring a plant - it's a great starting point. Feel free to contact us with your results!
How to use coloring pencils properly?
Using colored pencils properly requires the right technique and control. Jump to the section explaining how to hold and control your pencils, as well as the types of strokes and techniques you can apply for the best results.
How can I draw smoothly with colored pencils?
To achieve a smooth texture, like that of young human skin, you can either apply heavy pressure with a basic colored pencil and burnish with another, or use light pressure and build up layers gradually. We have a variety of tutorials covering which colored pencils to use and the best techniques for creating smooth, lifelike textures like skin. Check out our skin tutorials here.
How do I draw realistic drawings with colored pencils?
To draw realistically with colored pencils, start by using reference photos. Focus on creating accurate proportions with your initial sketch, and then match the colors as closely as possible. Layer colors gradually to build depth and details, and blend to create smooth transitions.
How do I improve my drawing skills?
Practice daily, even if it's just for 10 minutes - consistency matters! Focus on small details instead of the whole picture at once. Try different techniques, experiment, and keep learning. Want to level up? Join us and become our student! We can’t wait to see what you will be able to create.
Why do my drawings look flat?
If your drawings look flat, it may be because you're not using enough contrast or depth. Many beginners are afraid to use deep colors like black because they can’t be erased, but using dark tones is key to creating dimension. Start with the darkest areas, like shadows, so you can establish depth early on. If you're not happy with how it looks, you can always start over before you've added too much detail. By adding the deepest values, you can bring your drawings to life and avoid a flat appearance.
Is drawing from a reference photo just "copying the picture"?
No, drawing from reference photos is not just "copying the picture". It's a valuable skill that helps you learn proportions, master the medium, and bring out the most detail. Drawing from imagination can't help you dive into the finer details or get proportions right, if that's your goal. Drawing using photograph references will help you develop your skills and style, eventually helping you create more original and creative work.
Is tracing cheating?
Absolutely not. Many artists trace to get accurate proportions. Painters, tattoo artists, and even illustrators often use transfer paper or projectors to ensure their work is proportionally correct.

Having a traced sketch isn't enough; incorrect shading and coloring can distort a proportional sketch, while proper shadows and highlights can make an unproportioned sketch proportional.

Our instructor doesn't use tracing because the paper she works with (Bristol and watercolor pads) is too thick to see through. When drawing from reference photos and accuracy in proportions is important, she uses the grid method. For more on grid drawing technique, a free tutorials, and to use the Free Grid Drawing Tool where you can place digital grids over your own reference photos and download them for free, visit the GriDraw website.
What is the difference between wax-based and oil-based colored pencils?
Wax-based pencils (like Prismacolor) are soft, creamy, and vibrant, easily spreading across the paper. However, due to their wax binder, they can create a wax bloom on the finished piece. Oil-based pencils (like Faber-Castell) are firmer, slightly less vivid, and harder, making them ideal for precise work. Wax-based pencils tend to be more opaque, while oil-based pencils are more transparent. Both types are highly blendable, even with each other!
How do I remove the wax bloom or haze that forms on wax-based colored pencils?
Simply wipe it off with a tissue. If you plan to continue drawing, spray a workable fixative. If you're finished, use a permanent fixative to seal the artwork.
How do I erase colored pencils?
Colored pencils are difficult to erase - darker ones can be almost impossible. However, an electric eraser can remove as much as possible. If you're drawing on white paper, you can cover mistakes with a white gel pen for clean corrections.
What is a fun fact about colored pencils?
Did you know? The first colored pencils were created in the 19th century, and they were made with pigments wrapped in wood. However, they didn't start to resemble the colorful, vibrant pencils we know today until the 20th century when companies began to add wax and oil-based binders to the mix, allowing for smoother application and brighter colors!
How do I choose the right colored pencils and match colors from a reference photo?
Choosing the right colored pencils and accurately matching colors from a reference photo can be challenging. Sometimes, we think we've picked the right color, only to find out later it doesn't match. Other times, we may not consider using grays in a portrait, yet they can be a great choice. That's where PenPick comes in - a subscription-based web application designed specifically for artists. With PenPick, you can upload your reference photo, select a color, and get recommendations for the closest matching pencils from a variety of popular brands (28 in total), including Prismacolor Premier, Faber-Castell Polychromos, and Caran d'Ache Luminance 6901.
bane batman drawn suoerheroes derwent Procolour Coloursoft best colored pencils

Paper, Erasers, Sharpener, Extenders

Paper:

  • Drawing on high-quality, thick, sturdy paper is essential, especially when blending colored pencils in multiple layers. Consider using smooth, fine-toothed paper, such as a Bristol drawing pad, for optimal results.
  • Toned paper can be a valuable choice to explore values and color behavior under different conditions. In our tutorials, we often feature drawings on toned paper, including shades of grey and even blue.

Erasers:

  • Colored pencils are not easily erasable, especially after blending. Electric erasers can help remove small areas of color and create patterns (see demonstration).
  • Precision knives are also useful for removing light pencil marks and adding fine details.

Sharpeners:

  • A simple, sharp, and preferably new sharpener is essential for preventing wax-based colored pencils from breaking easily.

Pencil Extenders:

  • These are recommended for fully utilizing colored pencils without waste. Pencil extenders provide balance and make it feel like you're using a new pencil.
colored pencils creating highlights over drawing

Blenders, Fixative, Sketching, and Highlighting Tools

Wax Colorless Blender:

  • Use this tool to soften animal fur and create a blurry background. It's a wax pencil with no pigment and can be used as a smudger.

Fixative:

  • Wax-based colored pencils may develop a wax bloom. Wipe it with a tissue and use a fixative to prevent further bloom.

For sketching:

  • A graphite pencil is handy for sketching and, as opposed to colored pencils, can be easily erased.
  • A drawing compass with a pencil holder allows you to draw perfect circles with colored pencils.

Tools for highlights:

  • Opaque white markers and gel pens are great for creating highlights, such as animal whiskers, over colored pencil drawings. They are easy to apply, and mistakes can be corrected both while the ink is still wet and once it has dried.
colour pencil drawing techniques and tutorials for the complete beginner Colored Pencil Tutorials Drawing Techniques Browse Videos
Colored Pencil Tutorials how to Draw a Bald Eagle Colored Pencil Tutorials Drawing Techniques Art Lessons on Bald Eagle Watch Tutorial

COLORED PENCILS - Lesson & Project for Beginners

Mastering Pencil Grip and Control

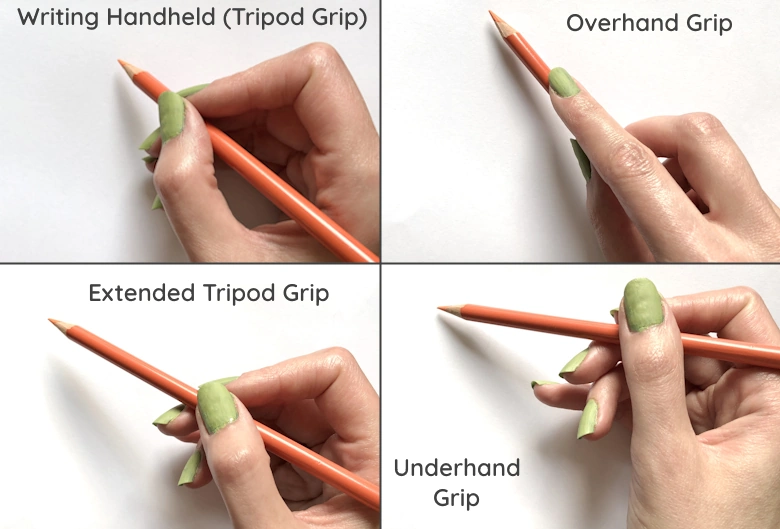
Writing Handheld (Tripod Grip)

This grip resembles how you hold a pencil or pen while writing, with only the tip of the pencil touching the paper. It's ideal for drawing contour lines and intricate details, offering precise control. To enhance control, rest your hand on a separate piece of paper or a tissue to prevent smudging.

Overhand Grip

In the overhand grip, you use the side of the pencil lead and hold the pencil almost parallel to the paper. This grip is suitable for coloring larger areas quickly, but avoid applying heavy pressure. It's useful for creating specific textures and for situations where vivid colors are not required. For the best results, use this grip when standing and move your arm from the shoulder.

Extended Tripod Grip

Similar to the tripod grip used for writing but with a slightly higher grip on the pencil. This grip allows for longer lines in a single stroke, making it excellent for drawing extended features.

Underhand Grip

The underhand pencil grip, similar to the extended tripod grip, but involves turning your hand with the palm facing up. This grip is especially effective for drawing hair due to its relaxed nature.

Art Instructions how to hold a pencil

Pivot for Movement: To move the hand holding the pencil effectively, use one of three pivot points: drawing from the wrist, drawing from the elbow, and drawing from the shoulder. Practicing all three methods helps train the relevant muscles and improve your drawing skills. Experiment with drawing various shapes and lines to develop your technique in just a few days of practice.

Understanding Pencil Lines

Hatching
  1. Start by using any colored pencil, drawing lines towards the highlight of the curl. Apply strong pressure at the darkest area and release it towards the end of the lines.
  2. Repeat this on the opposite side, pressing firmly and gradually releasing the pressure as you approach the previously drawn area. Leave some space in between for larger and shinier curls or less for tiny curls.
  3. Add shadowed hair using a darker shade, pressing hard at the beginning and releasing pressure as you move towards the highlight.
  4. Finish by re-emphasizing the highlight with a white pencil and draw towards the darker areas. Add random hairs with a white pencil or any other bright-colored pencil for a shiny, curly lock of hair.
lines in drawing Step-by-Step Tutorials Techniques Art Lessons
Crosshatching

crosshatces Draw Colored PencilCrosshatching is a method used to create various textures, such as fabric patterns. It involves applying parallel pencil strokes closely together in one direction and then adding lines at a 90-degree angle to the previous set.

This technique is suitable for objects like hats. I recommend practicing these strokes on a separate piece of paper first.


Stippling

stippling technique with coloured pencils Stippling involves creating shadows and highlights by using dots. Artists often use this technique to create intricate artwork. To create shadows, dots are placed closer together, and for highlights, they are spaced further apart.

Stippling is particularly useful when you want to achieve a textured look and work gradually without making mistakes.


Scribble

scribbling with pencils over paper to create realistic drawingScribbling entails drawing lines freely and randomly to cover an area. Scribbling typically refers to the early, uncontrolled, and random marks made by young children as they develop their fine motor skills.

Scribbles can be simple, chaotic, and lack a deliberate structure. This technique is excellent for creating various textures and allows for a relaxed and spontaneous approach to drawing.


Circulism

circulism technique colored pencil lessons for smooth even texture like skinThe circulism technique involves creating textures by applying overlapping circles, as illustrated in the left image.

This example serves to provide a better understanding of how to draw the lines. In practical application, we must make the circles much closer to each other and repetitively layer them until we achieve a consistent texture.


drawing technique for skin Now, let's repeatedly draw circles on top of one another. The final result, as depicted in the right image, demonstrates how this technique allows us to fully cover the paper. When applied with firm pressure, it can create a perfectly even texture.

Circulism is especially valuable for rendering human skin and similar textures. The proffessional artists frequently use this method and highly recommend it as a means of applying lines to achieve a uniform texture with no visible strokes. The smoother and tighter the circles, the more seamless the coverage.

Color Theory

Understanding color theory is crucial when working with colored pencils, especially when you need to mix colors to achieve the right shades. There are countless hues required for your artwork, so knowing how to create new colors with a limited set of colored pencils is very important.

Three essential terms play a significant role in color mixing for your drawings: hue, saturation, and value.


Hue

Hue refers to the name of a color, such as red, green, purple, and so on.

Colored Pencil hues wheel color chart

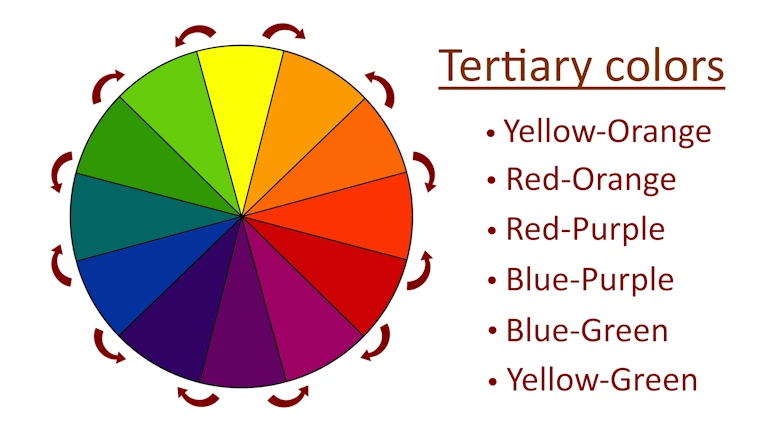
There are three primary colors: yellow, red, and blue, which cannot be created by mixing other colors. Every other color results from combining these three primary colors with each other, along with additional colors, black, white, and various shades of grey.

Color chart of primary colors

Then, there are the secondary colors. Combining yellow and red results in orange. Red and blue make purple, while blue and yellow make green.

diagram with secondary colors

Mixing a primary color with a secondary color creates tertiary colors. Yellow and orange make yellow-orange, orange and red make red-orange, red and purple make red-purple, purple and blue make blue-purple, blue and green make blue-green, and green and yellow make yellow-green.

tertiary colors color chart

Saturation

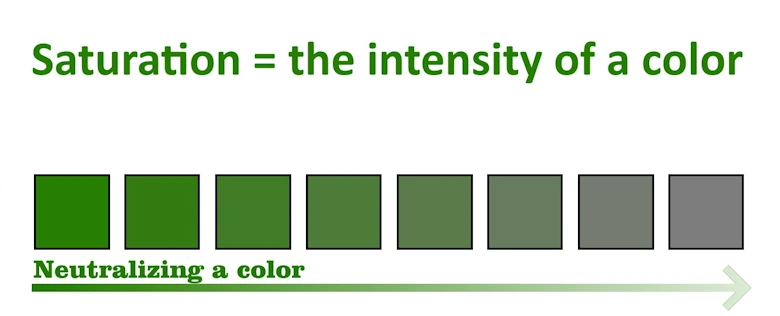
Saturation, sometimes called chroma, refers to the colorfulness or intensity of colors, indicating how rich and vivid a color appears. High saturation signifies that the color is very vibrant, while lower saturation indicates that the color lacks pigments and may appear washed out. It's important to note that adding gray to a color effectively neutralizes it.

How to create less saturated colors

Value

Value indicates the darkness or brightness of a color and can also be referred to as brightness or lightness. Colors can look significantly different with varying values, and this is particularly crucial when working with colored pencils to achieve a smooth gradient, a fundamental aspect of realistic drawing.

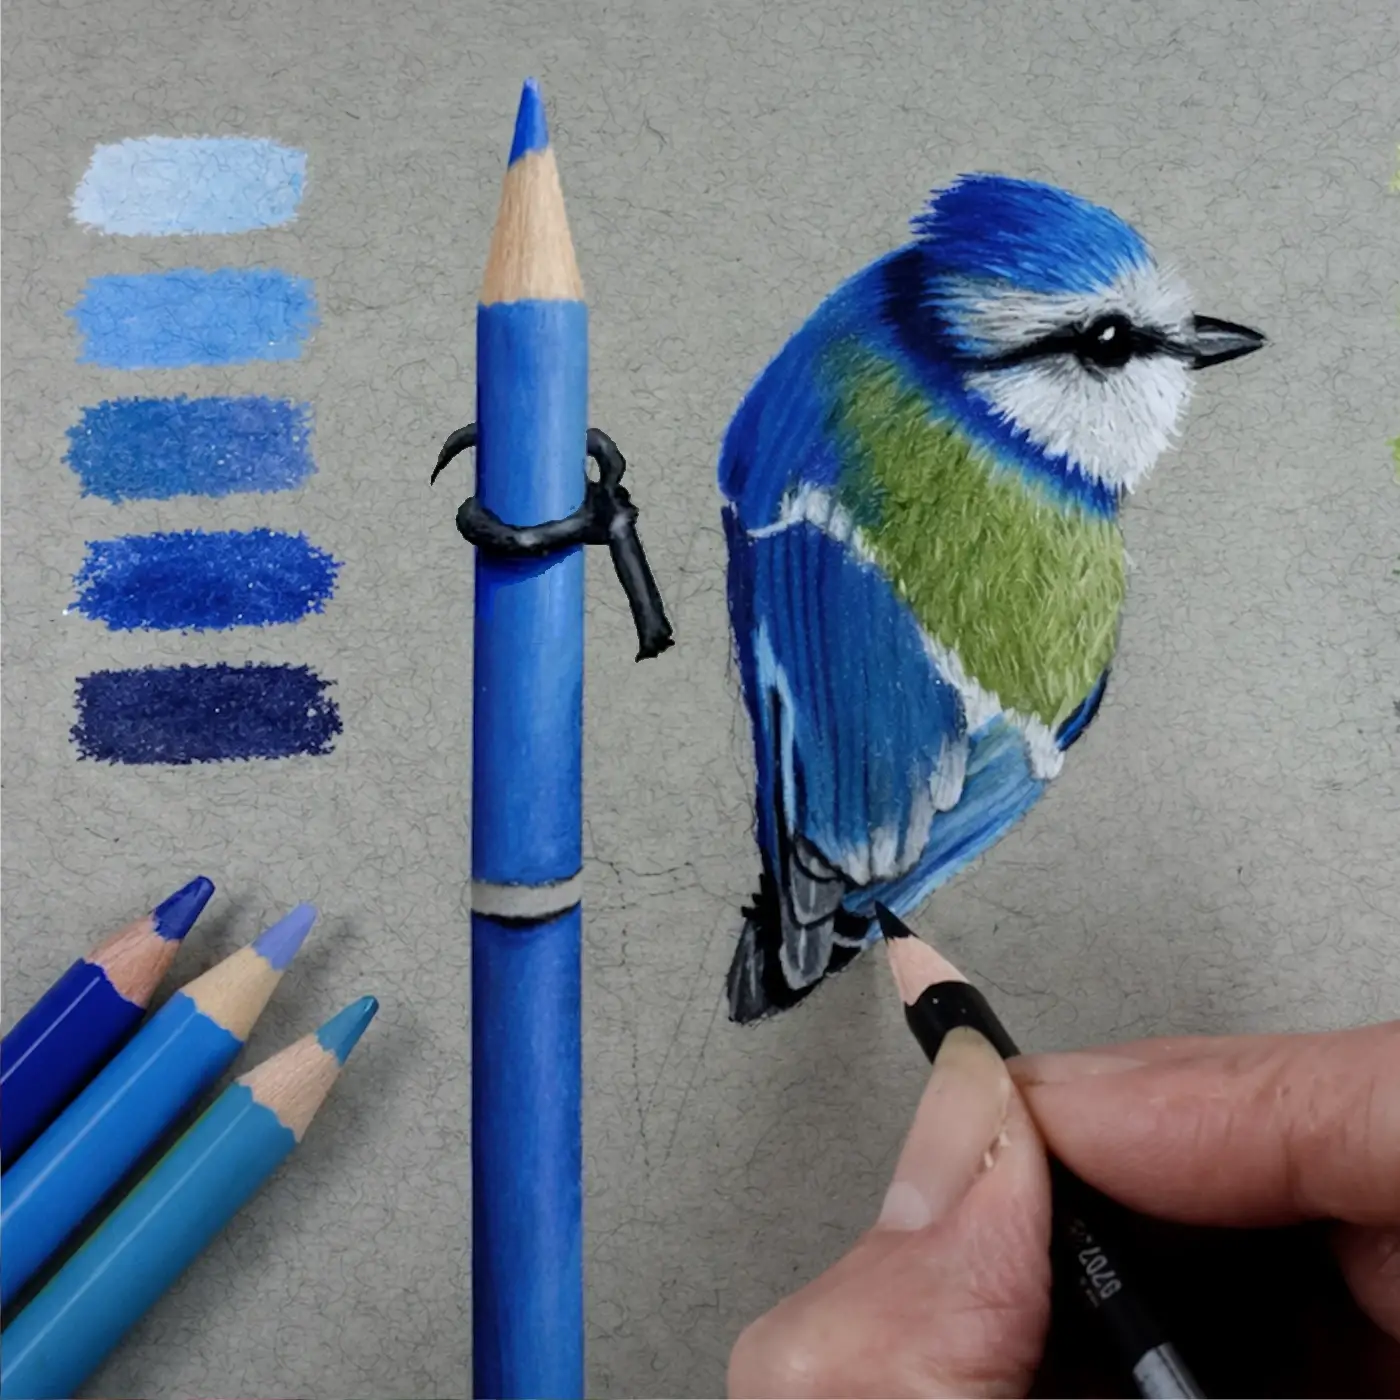
Any hue can be darkened by adding black, a technique known as shading, or lightened by adding white, known as tinting. Our instructor often creates colors for drawings by starting with a base hue, such as mid-toned green, and then adds shadows and highlights. This approach allows for adjustment of the value of the colored pencil, without necessarily adding black to decrease its value. For instance, you can darken the color by layering dark green over the mid-tone or lighten it by applying light green.

different values of colors important for drawing

Click the button for a new challenge.
Come back tomorrow for a new pencil drawing idea.

Need ideas what to draw? Your free reference photo will appear here.
Reference Image

What Should I Draw? Tips to Stay Motivated

  • Follow inspiring artists: Stay motivated by following artists on social media, including our instructor Jasmina Susak. Seeing their work can spark new ideas and keep you engaged.
  • Draw what excites you: Creating art you genuinely enjoy keeps you inspired. If you're forcing yourself to draw something uninteresting, it may feel like a chore.
  • Track your progress: Instead of comparing your work to professionals, compare it to your past drawings. Seeing your improvement over time is motivating. Avoid comparing yourself to beginners too—it might make you complacent when there's always room to grow.
  • Make drawing a habit: Even 10 minutes a day helps maintain your skills and creativity. Taking long breaks can lead to art block, so keep your momentum going with consistent practice.
  • Join our community: Share your work, get feedback, and stay inspired with our supportive members and tutors. Join us for endless drawing ideas and inspiration.

How to use Colored Pencil - Color Mixing

Even when you have the largest set of colored pencils, you can't always find a perfect match for the color you need. So, you have to mix the colored pencils to layer them over each other.

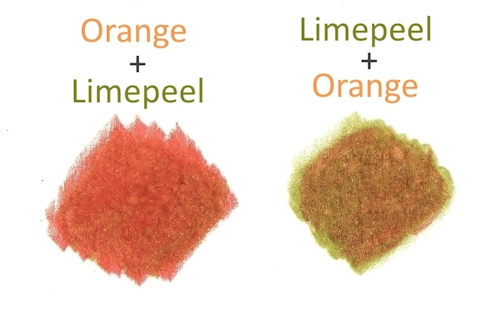
The most crucial aspect of mixing colors is the order in which you apply them. The first layer will dominate and influence the final color, as well as your ability to build up additional layers. For instance, if you want to blend very different colors, such as Lime Peel with Orange, you will achieve entirely different results depending on the order of application. In the image below, the swatches are displayed. On the left side, Orange was initially applied, followed by a layer of Lime Peel. On the right side, Lime Peel was used as the first layer, with Orange applied as the second layer.

How to mix Colored Pencils

In a second example, when Dark Brown is applied as the initial layer, it becomes nearly impossible to erase it, even with the use of an X-Acto knife, because the dark brown pencil completely saturates the paper fibers. In the following image, two swatches are displayed. The swatch on the left side consists solely of dark brown, and an attempt was made to erase it with an X-Acto knife. However, for the swatch on the right side, Cream was applied as the first layer, and Dark Brown was drawn over it.

Notice the significant difference between the two swatches, with Dark Brown appearing much lighter when applied as a second layer over a very light pencil like Cream. Therefore, it is crucial to consider the order in which colored pencils are applied. As shown, Dark Brown could be easily removed entirely with an X-Acto knife, making Cream clearly visible once again. Even using a nail can achieve this. This feature is particularly beneficial for beginners working with colored pencils, as it allows for correction and prevents overly dark colors. Applying the Cream color first ensures it saturates and fills the paper fibers, and the choice of the initial pencil will always influence subsequent layers.

How to Draw Colored Pencils swatches charts

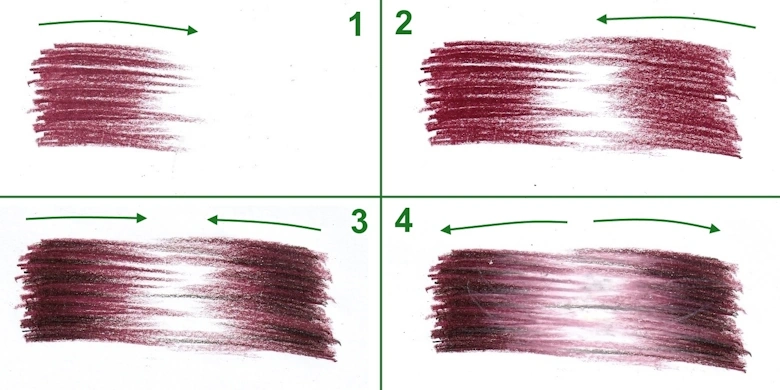
Sometimes, we need to mix colors differently, such as when creating a smooth gradient (which we'll discuss in more detail later) between two distinct colors. In the following image, you can observe the seamless gradient between red and orange.

On the left side, Crimson Red is used, applying heavy pressure that gradually decreases as the drawing progresses towards the right side. On the right side, the artist begins with Orange, also using firm pressure and working towards the red, overlapping the red-colored pencil. Subsequently, Crimson Red is picked up again to fill in areas with a distinct edge until the transition between the red and the orange becomes imperceptible. Achieving this seamless gradient is essential for realistic drawings and requires practice.

How to Draw smooth gradient transitions

Sometimes, colors may appear overly vibrant, and a less saturated shade is needed. In such cases, color intensity can be subdued by layering with grey-colored pencils. When a grey pencil is introduced, the initial color becomes less vivid, a process known as color neutralization, as previously mentioned. In the following example, Red Crimson swatches are displayed. The right side features pure Red Crimson, while on the left swatch, Warm Grey 30% is layered over it. Observe how the right swatch appears less vibrant compared to the left swatch.

easy tutorials for beginners

To alter the value of a color, it must be made either darker or lighter. Our art instructor frequently begins by applying the primary color first, then adding shadows and highlights to create dimension and avoid a flat appearance.

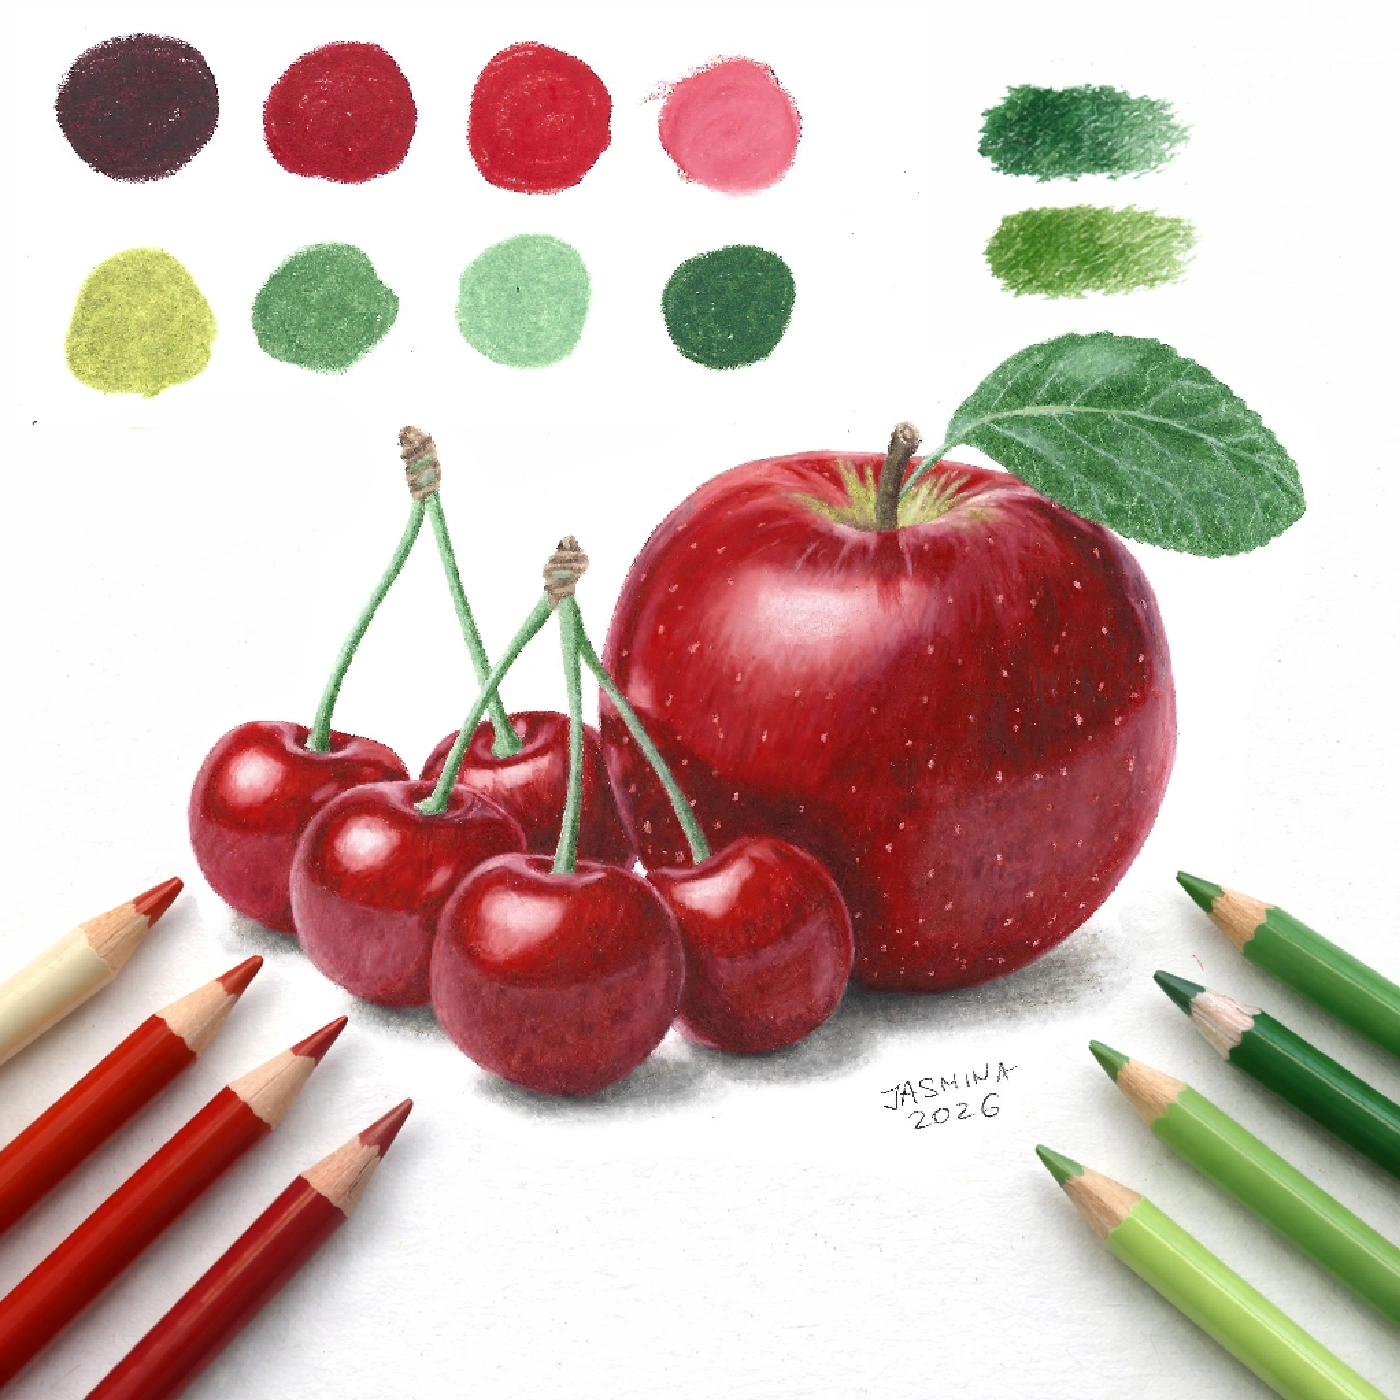
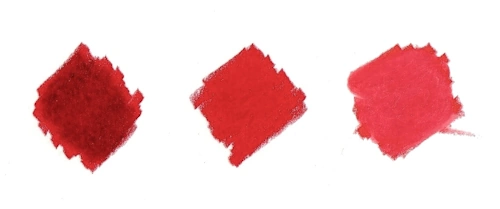
For this example, three swatches were created using Crimson Red. The middle swatch, which remains unaltered, serves as the base color. On the left side, Tuscan Red is applied to darken the Crimson Red. Tuscan Red resembles a dark red. You might wonder why we didn't use Tuscan Red alone for the swatch on the left side. This is because it would reveal the distinction between the two colors. The same principle applies to the swatch on the right side; Pink, for instance, could be used. However, a white colored pencil was employed to lighten it and create a higher value of Crimson Red.

Pencil Tutor Drawing

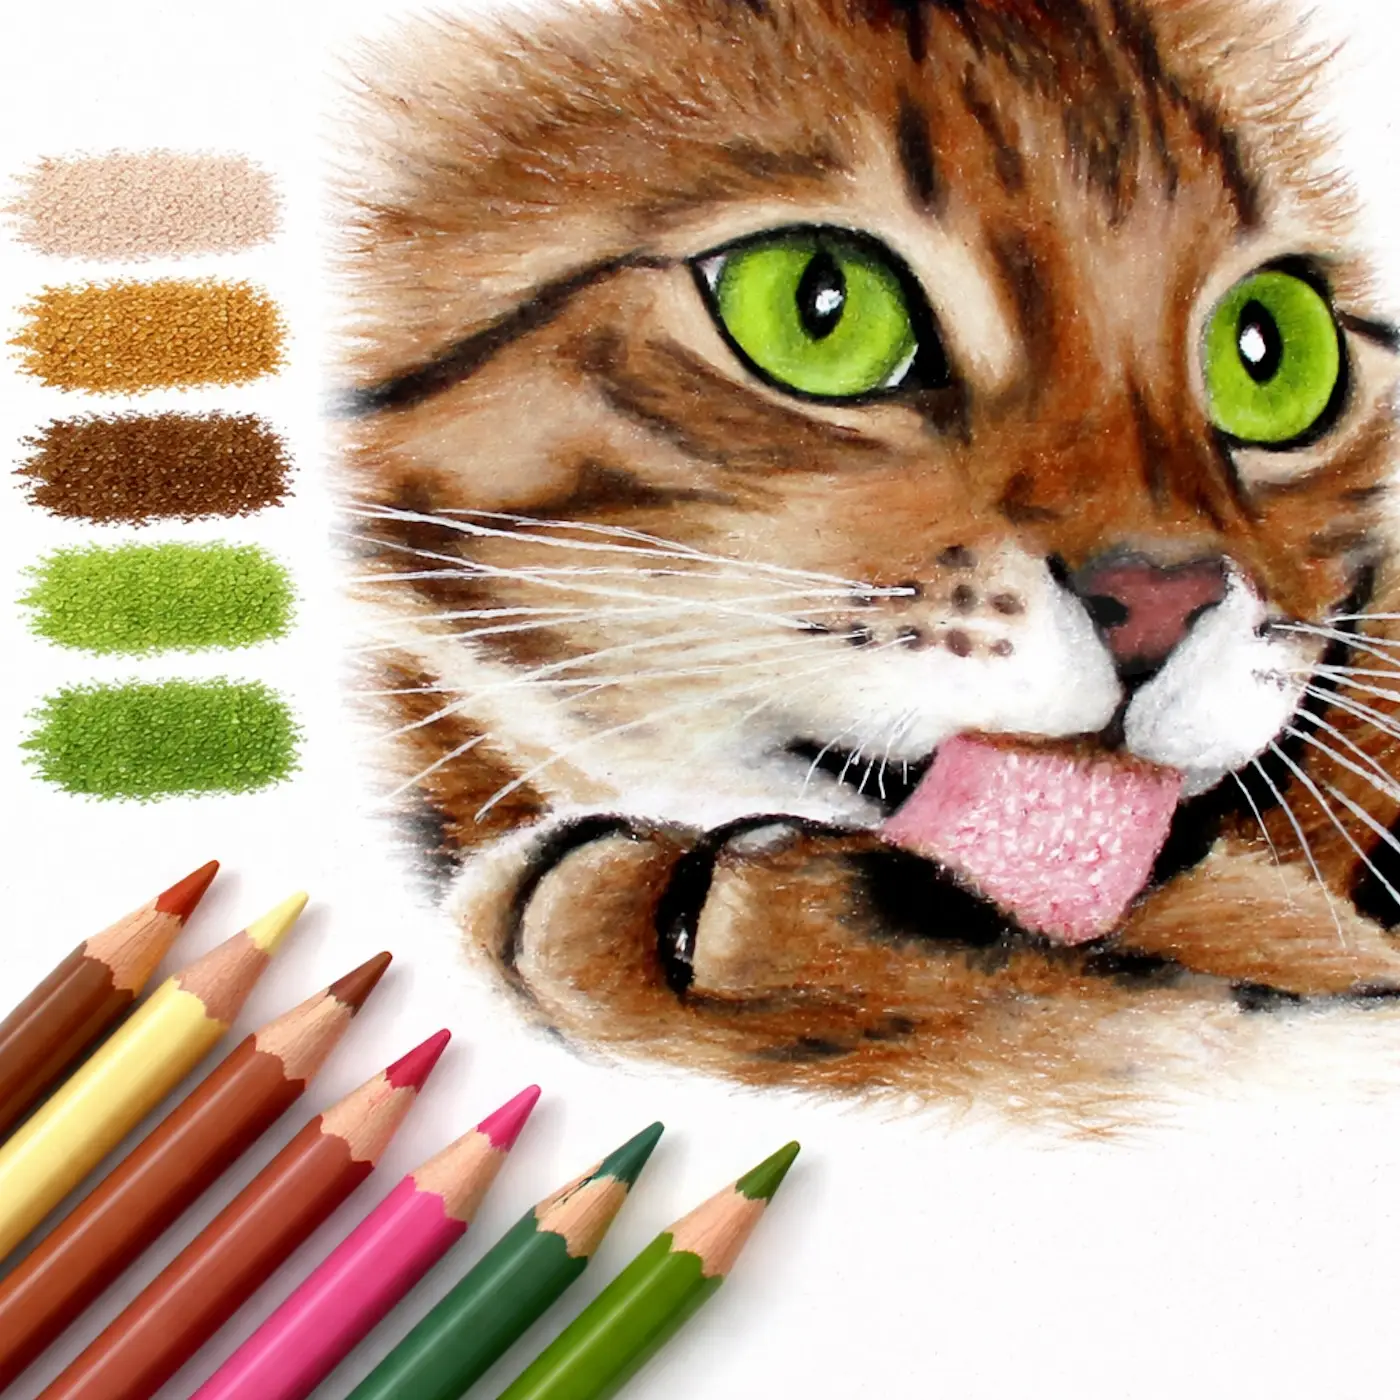
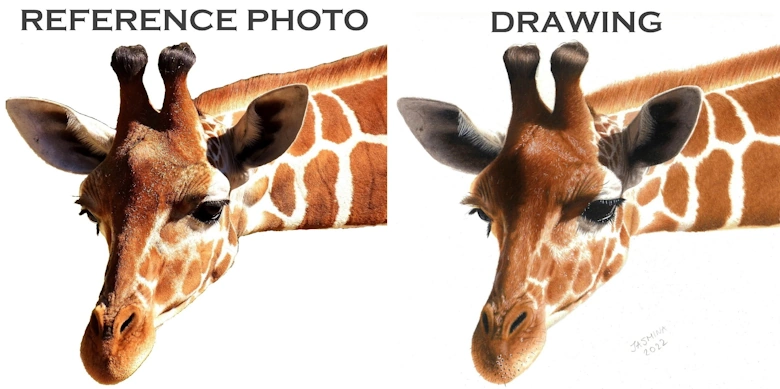
Let's see this theory in practice in a real drawing of the gecko. In the image below, you can see four stages of the coloring process: coloring the whole area evenly with Apple Green, shadowing the darker parts with Dark Green, creating the highlights with a white colored pencil, and adding details. See whole tutorial.

Colored Pencil Tutorials Drawing gecko

Drawing skin tones with colored pencils

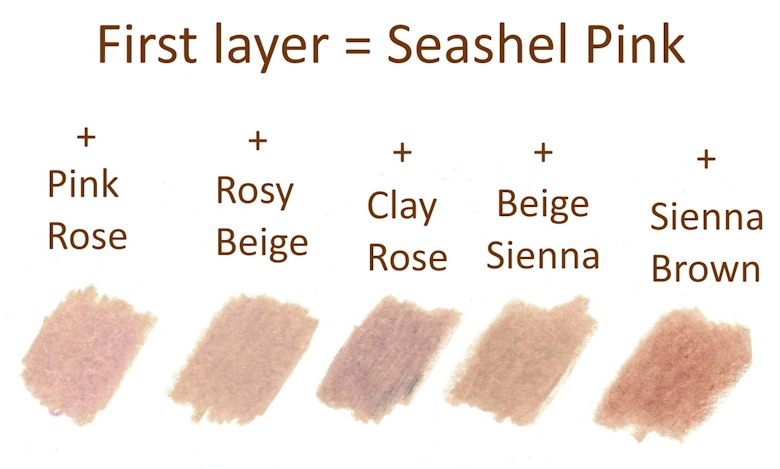
Now, let's explore one approach to mixing colors for human skin, a crucial skill for those interested in drawing portraits. Many individuals are eager to learn which color pencils to use for skin, how to blend colors, create a smooth skin texture, and which tools to use for blending colored pencils.

The answer, however, is quite intricate due to the diversity of skin tones. A single portrait requires a wide range of values and often involves different hues within the same portrait because various facial features demand distinct colors. Trying to create skin tones by mixing primary, secondary, and tertiary colors can be a challenging task. To render lifelike skin, you would typically need to introduce light gray (or a combination of a significant amount of white and a smaller amount of black) into orange or yellow. Fortunately, artist-grade colored pencils, such as Prismacolor Premier, offer a variety of colors like beige, peach, and pink that can be blended to accurately depict human skin.

How to Draw human skin
facebook share button colored pencil picker Pin It colored pencil picker Share on Twitter colored pencil picker

It's important to note that mastering this skill is not simple. To make it more approachable, here are five swatches with Seashell Pink as the base layer, each overlaid with a different colored pencil. Pink Rose is applied over the first swatch, Rosy Beige over the second, Clay Rose over the third, Beige Sienna over the fourth, and Sienna Brown over the fifth. These variations demonstrate the range of colors achievable for skin, underscoring the importance of practicing these combinations. Switching the order of application would yield different skin tones.

In the next demonstration, focusing on darker skin tones, Beige Sienna is applied as the initial layer to create three swatches. As a second layer, Dark Brown is applied to the first swatch, Chocolate to the second, and Dark Umber to the third, all using Prismacolor Premier colored pencils.

skin tones to Draw Colored Pencil Tutorials Drawing
rihanna portrait colored pencil picker realistic draw Grid image

Learn to Draw Portraits in Colored Pencil

The possibilities are limitless, and the color choices may vary depending on the environment and specific facial areas. For instance, a clean-shaven man's jaw can feature warm or cool grays, while the cheeks in women's portraits may exhibit a pinkish hue, and a hint of violet may appear on the nose, among other variations. Keep in mind that individuals wearing green clothing may have subtle hints of green on their neck and cheeks, and those with red hair may experience a reflected red tint on their skin. However, it's crucial to establish the primary skin tone as a foundation before refining it. Practice and creating personalized swatches are key to mastering these techniques.

A Smooth Gradient

A smooth gradient is the most important in creating a realistic style of drawings. Once you learn to create a smooth gradient, you will be able to draw anything with photorealism. A smooth gradient is what turns a two-dimensional drawing into a three-dimensional one because it imparts a rounded shape to the objects.

smooth gradient art Drawing

How to Blend with Colored Pencils - Free Drawing Tutorial

Practicing Smooth Gradient

Let's practice creating a smooth gradient in a simple way by coloring a plant. This exercise will help you improve your skills.

To begin, create the main outlines randomly, as demonstrated in the next image. There's no need to draw any specific type of plant; you can use your imagination, so the shape is not a critical factor. Start by sketching it using Dark Green Prismacolor Premier.

how to sketch a plant Step 1 tutorial

Let's create highlights where the leaves bend somewhere in the middle of their length. We can use Grass Green for this purpose. Start by drawing lines from one end towards the mid-area of the leaf. Gradually lift the pencil's tip off the paper as you finish each stroke, applying light pressure at the end of the stroke. This way, each line will gradually disappear into the white color of the paper, and together they will create a smooth gradient between the green and white. Finish drawing the line wherever you want the highlight of the leaf to be. So, press very hard at the beginning of each stroke and release the pressure as you finish, applying quick, confident strokes.

How to Draw apply colored pencil Step 2 tutorial

Now, let's create highlights from the other side of the leaf. Begin at the top of the leaf, applying firm pressure, and gradually reduce the pressure as you slightly lift the pencil off the paper. You can refer to the next image to observe the desired effect. As you can see, it already appears bent and even has a shine, but our work isn't complete yet.

Colored pencil blending technique Step 3 tutorial

Apply the same technique to each leaf on the entire plant. Begin on both ends, pressing firmly and gradually reducing the pressure as you approach the middle of the leaf. Throughout this process, continue to use Grass Green, or if you prefer, you can opt for other green pencils like Spring Green or Parrot Green, which work well for coloring plants. By following these steps, you'll notice how the plant acquires a three-dimensional shape and no longer appears flat.

How to Draw and blend coloured pencil Step 4 tutorial

In this step, we will color the highlights to ensure they don't remain white. To achieve this, you can use Grey Green Light. Apply it over the lighter parts (the ends of the strokes) of the Grass Green. Press firmly to blend these colors together. The objective here is to make the edge between the Grass Green and the Grey Green Light vanish, so keep blending until the edges become invisible. If some of the highlights are a bit brighter, it means that they are more illuminated than the others, so it's not a problem. However, we can always darken them or lighten them as we need. If you go over it with a white pencil and press very hard, you will be able to lighten up the area. If you can still see the edge between the highlight and the Grass Green, simply pick up the Grass Green again and darken the areas to make the edge between the two colors invisible.

Colored pencil Tutorial mixing colors Step 5 tutorial

Now, let's create shaded areas or modify the value of Grass Green at both the top and "roots" of the leaves by darkening them with a Dark Green colored pencil. This will add a rounder shape and depth to the leaves in the image. Additionally, it's essential to create cast shadows over the underlying leaves, so press firmly with the Dark Green pencil. The shaded regions should gradually blend into the Grass Green color. To achieve this, apply the same technique: start with strong pressure when drawing lines at the two ends and reduce the pressure as you draw strokes toward the highlight. Repeat this process for each leaf.

Free drawing and shading tutorial Step 6

In the image below, you can observe the result on the right, comparing it to the graphic on the left created with a single color without varying the pressure. This demonstrates the power of a smooth gradient – our drawing on the right appears three-dimensional with shape, in contrast to the flat, two-dimensional image on the left.

Tutorials Drawing Step 7 easy step-by-step art lesson
Colored Pencil Tutorials how to Draw on toned paper How to Draw Colored Pencil Tutorials Drawing gray paper Browse Videos

New to Drawing? Start in Black & White to Learn Values Before Working with Colors at Pencil Drawing Tutor

Link to Pencil Drawing Tutor


giraffe fur pencil drawing tutorial photorealistic lips drawing, tutorial for beginners orca killer whale drawing tutorial step-by-step drawing and shading the eye with pencil

Our Students' Art at Colored Pencil Tutor